The past 2 months I have been stalled looking for a reasonable quote on spray painting the car. It seems I have at last found someone prepared to do it for less than a kidney transplant.
The only hurdle is getting the car loaded and taken to Jo'burg. And they can only do it in January. So my start date has been put out to February.
Wednesday 5 December 2012
Tuesday 27 November 2012
Still no Progress........
Well y'all must be wondering what further stuff I have managed to do since I got back from Bots.
To be honest, nothing, what with shooting competitions, trips to the Cape, visiting the kids etc etc. every weekend has been chock-full of activity but nothing to do with car building.
The other factor is of course the spraypainting. I have got to the stage where if I put anything on the car I am going to have to remove it if I wanta decent job done. This last weekend of the 24/25th November a buddy has hooked me up with a quality painter who can do the job for less than R10K. My next best quote was R19K - a significant gap!!!!
So let's see how this pans out.....
Wednesday 17 October 2012
Stuck in Botswana
Anyone following this blog will have noticed that I've not been active for a couple of weeks. The reason is simple - I have taken 2 weeks off from my normal D2D grind and been busy working in Botswana as part of an Operational Review team at Debswana's Orapa Diamond Mine.
I have basically finished all I can do to the car prior to painting, so when I get back my first move will be to get her to the wheel alignment shop and then the paintshop.
I have basically finished all I can do to the car prior to painting, so when I get back my first move will be to get her to the wheel alignment shop and then the paintshop.
Monday 1 October 2012
Round up.....
There are a lot of small things going on, not enough to warrant a post all their own, but enough that they should get mention somewhere.
First, I got the rear brake disks. Those were fitted with a minimum of fuss. So now the car can be lowered. But that is not going to happen just yet.
The essential hoses for the cooling system are in, only the header tank needs fitting, and for that the scuttle needs fitting. The correct fittings for the water rail are also fitted.
I bought a rivnut gun, and I am busy drilling holes in the scuttle for the washer bottle, header tank and the brake and clutch reservoir bracket.
The spark plugs are fitted.
I am busy replacing every galvanized capscrew with stainless steel ones.
I'll tackle some wiring this Saturday.
Wednesday 19 September 2012
Coil Pack......EPIC FAIL!!!!
Ok so I run down to my local Ford dealer and I order a new coil pack, as the old one is pretty beat up and chipped.
I specifically mention I want the one with the SQUARE connector port, post 2008, so it matches my Webcon harness.
I pay R850 because it has to be ordered special.
Cool, I wait for a day and I get a call from them to say my coil pack has arrived.
Yeah, you guessed it, it is the old one with the oval connector.
The confusion came in because I asked for a Coolant Temp Sensor for a 2002 Mondeo 2.0l and she ordered the coil pack from that model as well.
Fortunately the Webcon harness comes with an oval connector (as a spare), so I spent the evening cutting off the new-style square connector and attaching the old-style oval one to the harness.
I attached the wires to the new old-style oval connector the same way they were connected to the old new-style square connector.
The worst that can happen is that the engine will not start because the spark is being delivered at BDC instead of TDC. Swop the 2 wires around I am back in business.
Doing some internet research I found that when they changed over the coil pack from the old oval type to the new square type the orientation of the wires was indeed changed over, so I disassembled my new old-style oval connector and swopped the wires. These things are not meant to be taken apart once they are put together with the result that the metal contacts are a bit munched. I will try and source a new old-style oval connector from Ford.
Confused yet??
With my luck they will send me a new new-style square one, instead of a new old-style oval one.....
Quick note to everyone reading or accessing this blog - PLEASE LEAVE COMMENTS IF YOU LIKE OR DO NOT LIKE WHAT YOU SEE AND READ!!
I see my count is on the rise - even from folks in Alaska.....?? I am trying to keep it light but unfortunately the content does require some technical talk!!
Sunday 16 September 2012
The Cooling System
I've decided to create my own cooling system layout. In a previous post I made mention of hanging the pump off the engine. I changed that idea to making a bracket and attaching that to the chassis and hanging the pump off that.
After that the rest was simple. If the bracket shows signs of fatigue I will make it out of steel.

The top section from the rail to the radiator was even simpler. I now need a couple of banjo fittings and fitting the header tank and I am done with the cooling system.


After that the rest was simple. If the bracket shows signs of fatigue I will make it out of steel.


I took time out to dummy-fit the throttle bodies, and found out my carefully assembled linkage was fouling the left top cross-member. I reversed it and now the linkage operates smoothly. I cannot fit these yet as she must go to the paint shop first.
I also bought some black paint for the headers and the cam cover.
Sunday 9 September 2012
Time out for a Rant
Yep, you read right I am downright pissed.
I am struggling with this cooling system. I seem to have been supplied with enough hoses, but there is no indication of what fits where or what connects to what.
On top of that I have gone with a water rail, which deletes at least 2 hoses and one pipe, and I have identified which pipe and what hoses they are - I will have to make up my own layout for that - but as for the rest it's a total mystery.
I also went with the electric water pump, and I spent the morning just staring into the well in front of the engine trying to figger where the water pump and its associated mounting hardware might fit. I could not see it.
Which brings me to my point. How in hell can Birkin put a product onto the market without detailed assembly instructions???
I'm not sure if Birkin realise what liability they are exposing themselves to. Would you travel in a car that was assembled by people who had no instructions on how to put it together?
They say they have the "Build Doctor" BIG FRICKIN' DEAL!!! The doctor starts out all very well but it looks like they got bored with it half way through and gave up.
The section does not cover (inter alia)
The Independent Rear Suspension
The Differential
Installing the Engine (various types)
The Cooling System (Fan, plumbing, fan switch, header tank, water pump)
The Exhaust system
It's farcical.
And the bits that are covered are out of date.
Sure it is a car for enthusiasts built by enthusiasts but not everyone is mechanically savvy to the degree that they can build it to factory spec as was intended. I place myself into that category.
I do realise that most of the assembly is self-evident, but even so...
When I started this I was assured that they (Birkin) had all the drawings and pictures needed on computer, and they were available on request.
Three months down the line and R200 000+ later I am convinced that is not true.
So what did I do today?
I fitted the horn, and the cooling fan and water-pump relays. And not even the horn fitted where I thought it was supposed to. I had to suss that one out for myself.
I then decided to man up and design my own water pump installation. You will see above the water pump mounting slot there is the open hole left by the
old Mondeo engine mount stud.

old Mondeo engine mount stud.


I am going to hang a M12 stud out the bottom and fabricate a bracket that will let the pump hang off that. A lot of the pump's weight will be taken up by the hoses. I will have to get some rubber mounts to null out any engine vibration. My problem with this idea is that the pump is no longer at the lowest point of the system guaranteeing flooded suction, but it is low enough.

Thursday 6 September 2012
The Water Rail and Exhaust Headers Completed
On Tuesday I had the rail welded up and it looks like a very neat job. I wanted to fit it that day but I had to go to Jo'burg on business and only came back today.
Cutting to the chase the headers were installed, tightened up with the supplied bolts (no studs) and the rail went on straight after with no issues.
It pays to fit and check before you fasten!


Finally I fitted the crank position sensor, using the jig, and fixing the damper with an M6 screw.

I had wanted to fit this while the engine was still on the engine stand, but I was worried it might get damaged in the installation - it is very exposed.
This weekend I will start piecing together the cooling system. This evening I tested the thermostat in a pot of boiling water (it works) and I also drilled a couple of 2mm holes in the thermostat's plunger as a bypass so that the electric pump doesn't cavitate while it is closed.
There are very few bits left to fit on this car - soon it will just be cosmetic stuff like the windscreen and the wipers.
Cutting to the chase the headers were installed, tightened up with the supplied bolts (no studs) and the rail went on straight after with no issues.
It pays to fit and check before you fasten!

Finally I fitted the crank position sensor, using the jig, and fixing the damper with an M6 screw.

I had wanted to fit this while the engine was still on the engine stand, but I was worried it might get damaged in the installation - it is very exposed.
This weekend I will start piecing together the cooling system. This evening I tested the thermostat in a pot of boiling water (it works) and I also drilled a couple of 2mm holes in the thermostat's plunger as a bypass so that the electric pump doesn't cavitate while it is closed.
There are very few bits left to fit on this car - soon it will just be cosmetic stuff like the windscreen and the wipers.
Sunday 2 September 2012
The Water Rail and Exhaust Headers
This morning I wanted to install the Raceline water rail. It is a very nifty bit of kit that does away with long hoses and pipes to bring hot water from the back of the Duratec to the front.
My first move was to temporarily install the exhaust headers, just to see there were no issues with that bit of the work. I found that the two rear lower manifold studs would not go in, because of the chassis strut.

I had previously had the cylinder head modified to accept the water rail, but this was without the headers in place.

Then I removed the first three headers, leaving the last one in place, fitted the rail and saw immediately there was interference from the exhaust flange. Off came the rail, out came the header and I used a disc grinder to remove metal from the flange. This was a trial and error process, with at least 3 fittings before it fitted. Note the ever-present rubber mallet, this was especially useful to discover binding points. With everything put together, bash the rail a couple of times, and on disassembly, touching points show up on the aluminium. Grind them off, and retry.
I repeated this for the two middle headers, grinding away a bit at a time until the rail fitted. I used the die grinder to remove some from the rail as well.

The last header to fit was #1 cylinder, and this was the big one - a lot of metal had to go from the rail. There was a big flange cast right above the header.

I just removed enough to clear the header, there was about 3mm clearance. The rail will now go to the welding shop where they will place a circular aluminium disk in the top and weld it up for a good seal.

Just to make sure I fitted the rail plus the headers again and it is all a good fit.

I now wanted to fit the cooling hoses and the electric water pump, but I have no clue how the hoses run, especially with a water rail thrown into the mix. So that job will wait until Birkin supply me with some guidance.
My first move was to temporarily install the exhaust headers, just to see there were no issues with that bit of the work. I found that the two rear lower manifold studs would not go in, because of the chassis strut.
I had previously had the cylinder head modified to accept the water rail, but this was without the headers in place.
Then I removed the first three headers, leaving the last one in place, fitted the rail and saw immediately there was interference from the exhaust flange. Off came the rail, out came the header and I used a disc grinder to remove metal from the flange. This was a trial and error process, with at least 3 fittings before it fitted. Note the ever-present rubber mallet, this was especially useful to discover binding points. With everything put together, bash the rail a couple of times, and on disassembly, touching points show up on the aluminium. Grind them off, and retry.
I repeated this for the two middle headers, grinding away a bit at a time until the rail fitted. I used the die grinder to remove some from the rail as well.

The last header to fit was #1 cylinder, and this was the big one - a lot of metal had to go from the rail. There was a big flange cast right above the header.

I just removed enough to clear the header, there was about 3mm clearance. The rail will now go to the welding shop where they will place a circular aluminium disk in the top and weld it up for a good seal.

Just to make sure I fitted the rail plus the headers again and it is all a good fit.

I now wanted to fit the cooling hoses and the electric water pump, but I have no clue how the hoses run, especially with a water rail thrown into the mix. So that job will wait until Birkin supply me with some guidance.
Saturday 1 September 2012
Engine Installation
The big day has arrived.
My first task of the day was to remove about 2mm from the outside of each flexible engine mount. This was easily done with an electric drill and an abrasive disc.
Next was the lift and this was horrendously difficult because while the dimensions were now fine, and we could get the left side M12 bolt in position, the right side was impossible to line up. So much so that we resorted to hammering in the bolt which resulted in a buggered thread. We replaced this with a M10 bolt just to take up the weight.
I re-attached the gearbox mount, and bolted on the sump guard cross member. This meant that if anything was to fail, it would result in a bent chassis and engine.
The engine was now supported by the left hand M12 bolt and the gear mounting, and the M10 bolt. Alastair gently let off the strain and ....she held!
Quickly I re-assessed my options: I re-arranged the sling so that it fastened to one central point at the front of the engine, seeing as it was fixed at the rear, and took the weight off the bolts holding the engine. I withdrew these, and also unscrewed the engine mount brackets for inspection. The right side one was totally chewed and ruined inside the flexible mount, and had to be cleaned up with a rat-tail file, so that the bolt could be inserted.
We then mounted the brackets on the chassis, and in turn, attached the brackets to the engine. Every cap-screw save the one went in - the front mounting point on the right side engine bracket is clearly out of line with the engine mounting hole by 2-3 mm.

The prop shaft was re-attached to the diff, and the reverse switch screwed into the gearbox.
The engine is now installed, and a major milestone met.

I also found my quick shift Quaife gear lever is about 3 inches too long.
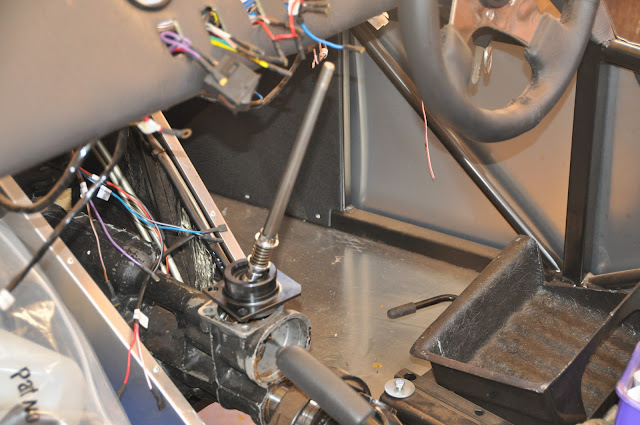
Next is the cooling system and the water rail.
My first task of the day was to remove about 2mm from the outside of each flexible engine mount. This was easily done with an electric drill and an abrasive disc.
Next was the lift and this was horrendously difficult because while the dimensions were now fine, and we could get the left side M12 bolt in position, the right side was impossible to line up. So much so that we resorted to hammering in the bolt which resulted in a buggered thread. We replaced this with a M10 bolt just to take up the weight.
I re-attached the gearbox mount, and bolted on the sump guard cross member. This meant that if anything was to fail, it would result in a bent chassis and engine.
The engine was now supported by the left hand M12 bolt and the gear mounting, and the M10 bolt. Alastair gently let off the strain and ....she held!
Quickly I re-assessed my options: I re-arranged the sling so that it fastened to one central point at the front of the engine, seeing as it was fixed at the rear, and took the weight off the bolts holding the engine. I withdrew these, and also unscrewed the engine mount brackets for inspection. The right side one was totally chewed and ruined inside the flexible mount, and had to be cleaned up with a rat-tail file, so that the bolt could be inserted.
We then mounted the brackets on the chassis, and in turn, attached the brackets to the engine. Every cap-screw save the one went in - the front mounting point on the right side engine bracket is clearly out of line with the engine mounting hole by 2-3 mm.

The prop shaft was re-attached to the diff, and the reverse switch screwed into the gearbox.
The engine is now installed, and a major milestone met.


Next is the cooling system and the water rail.
Friday 31 August 2012
Engine Installation - The First Try
This afternoon I hurried home to do some of the work needed before the lift.
During the day Alastair went to Struck and Schulz and swopped out the two mounting bolts for M12 socket head cap screws.
First thing to do was drill the body and establish a hole so that the port mounting bolt could be inserted. This was done relatively quickly with my die grinder, and then I moved to the exhaust portal and made a minor cut so that this bolt could be inserted in a similar fashion.
Off came the propshaft, and the gearbox mount was reversed.
Good, now we were ready, Alastair manned the crane jack and eased the engine off the trolley while I guided the motor up into the well. We were a well oiled team - poetry in motion - synchronised swimming has nothing on us.
But......
Our first lift revealed a problem we hadn't seen in the dark last night - the body dimension between the chassis mounts is about 4mm too narrow for the engine plus its mounts. This means I must grind down the mating faces of the steel mounts that hold the polypropylene flexible bobbins.
Good thing I now have a disc grinder.
God, I love power tools.
Thursday 30 August 2012
Engine Installation - Initial Steps
We assembled the Chinese Torture Rack last night - I cannot understand why the Chinese have an aversion to washers. We got bolts, nuts, but no washers or spring washers! My engine stand was the same. Nevertheless we assembled the engine crane in record time despite the crappy instructions and it works! I bought a whole slew of washers to install on the crane as I cannot handle looking at a nut with no washer. It doth offend mine eye.

Today we lifted the chassis - using the crane of course - and slid the engine out again so we could prepare it. That involved removing the manifold studs, and mounting some bolts to use as sling points. One other point was to remove the engine mounts from the chassis and mount them instead on the engine. With this done it is now down to lining up 2 bolts instead of 6. Good thing we did this as bolting the starboard mount onto the engine was a mission. It did not line up 100% and I would have hated to complete this job with a swinging motor and cramped engine bay. Thank heavens for Copperslip grease.

Then we did a test lift using my home made slings and the engine came up neat and straight. This was done outside of the chassis to check how she carried herself in the slings. I was reasonably sure of where the CG was.
Next we lifted the chassis (again) and slid the engine and trolley under the chassis for what is hopefully the last time.
We re-attached the slings and did another test lift. The engine has the alternator and starter fitted and there seems to be plenty of room.
 With some minor manoevering we were able to get the engine to line up "roughly", but we stopped at this point because I still have to drill an access hole on the left side of the body to allow insertion of the port-side bolt, and there is some minor relieving to be done on the exhaust portal to allow the starboard bolt to be inserted. It was getting too dark to see properly so we wrapped it up for the night.
As an added precaution I am going to undo the prop shaft from the diff. When we do this I want it to be a case of Alastair inserting the two bolts and then quickly under the car to attach the gearbox mount (which BTW must still be fitted right way round).
Today we lifted the chassis - using the crane of course - and slid the engine out again so we could prepare it. That involved removing the manifold studs, and mounting some bolts to use as sling points. One other point was to remove the engine mounts from the chassis and mount them instead on the engine. With this done it is now down to lining up 2 bolts instead of 6. Good thing we did this as bolting the starboard mount onto the engine was a mission. It did not line up 100% and I would have hated to complete this job with a swinging motor and cramped engine bay. Thank heavens for Copperslip grease.
Then we did a test lift using my home made slings and the engine came up neat and straight. This was done outside of the chassis to check how she carried herself in the slings. I was reasonably sure of where the CG was.
Next we lifted the chassis (again) and slid the engine and trolley under the chassis for what is hopefully the last time.
We re-attached the slings and did another test lift. The engine has the alternator and starter fitted and there seems to be plenty of room.
With some minor manoevering we were able to get the engine to line up "roughly", but we stopped at this point because I still have to drill an access hole on the left side of the body to allow insertion of the port-side bolt, and there is some minor relieving to be done on the exhaust portal to allow the starboard bolt to be inserted. It was getting too dark to see properly so we wrapped it up for the night.As an added precaution I am going to undo the prop shaft from the diff. When we do this I want it to be a case of Alastair inserting the two bolts and then quickly under the car to attach the gearbox mount (which BTW must still be fitted right way round).
Tuesday 28 August 2012
Preparation for the engine installation
So the preparations for preparing to install the engine in the chassis.....we're thinking about getting ready to start those.
We have the chassis up on the stand, and I am thinking that all along it has been really enjoyable working on the car at waist height, everything is accessable, I can get under the car easily....
So I am not going to drop the chassis onto the engine, I am going to lift the engine up into the chassis with the aid of a engine crane - a cheap and cheerful chinese foldup with 2 ton capacity is about R1600 - and work on the car while it is on the stand. When we have to drop the whole running car on the ground? I'll burn that bridge when it comes to crossing it!
When the engine is up inside, the trolley becomes a crawler.
We rolled the engine round to the workplace and slid it under the chassis - I had to lift the front while Al pushed it in.
 Here's another view from above:

We have the chassis up on the stand, and I am thinking that all along it has been really enjoyable working on the car at waist height, everything is accessable, I can get under the car easily....
So I am not going to drop the chassis onto the engine, I am going to lift the engine up into the chassis with the aid of a engine crane - a cheap and cheerful chinese foldup with 2 ton capacity is about R1600 - and work on the car while it is on the stand. When we have to drop the whole running car on the ground? I'll burn that bridge when it comes to crossing it!
When the engine is up inside, the trolley becomes a crawler.
We rolled the engine round to the workplace and slid it under the chassis - I had to lift the front while Al pushed it in.
I have identified a couple of potential hang up points like the manifold studs and the sharp eyed amongst you will have noticed that I have fitted the gearbox mounting plate arse about face.
Final Suspension Roundup
Alastair goes off on Monday morning to get the shocks shaved down, but gets told the fitter who does these things is on leave.
So I decide right there that I am going to do it myself - I head off to Midas that arvy and buy a Hitachi angle grinder and discs.
With Alastair holding down the shocks I run the grinder across the end of the shock and inside 30 seconds I have ground off enough metal. Quick test fit and in she goes! I do the second shock and that too fits beautifully. This means we have basically finished the suspension, and all that remains is the wheel alignment, fitting the rear brake discs, adjusting the handbrake and bleeding the brakes.
 We fit the wheels and tyres and now (roll drums please) we have a rolling chassis.
Er......Not quite, it is still up on the stands and the studs holding the rear wheels on are too long (no disc acting as a spacer.........) so they foul the hub and impede rotation of the wheel.
So I decide right there that I am going to do it myself - I head off to Midas that arvy and buy a Hitachi angle grinder and discs.
With Alastair holding down the shocks I run the grinder across the end of the shock and inside 30 seconds I have ground off enough metal. Quick test fit and in she goes! I do the second shock and that too fits beautifully. This means we have basically finished the suspension, and all that remains is the wheel alignment, fitting the rear brake discs, adjusting the handbrake and bleeding the brakes.
Er......Not quite, it is still up on the stands and the studs holding the rear wheels on are too long (no disc acting as a spacer.........) so they foul the hub and impede rotation of the wheel.
Monday 27 August 2012
Suspension and Brakes

Saturday morning Alastair and Rita ducked to Polokwane so I was left to myself to fix the gearbox leak. I first had to remove the starter/bellhousing/gearbox combo from the engine which was fairly easy, but to remove the bellhousing from the gearbox was a real mission. This was (as I found out later) the thread used on the cap screws supplied by Birkin is not the same as the thread that is in the gearbox. When I first attached the bell housing to the box I used the impact wrench and did not feel any resistance. This time I started to unscrew it manually and quickly gave up. I had to use an impact wrench all the way out. There was something funny going on here....
I removed the clutch actuator, undid the bellhousing/gearbox cap screws and examined the bearing retainer/input shaft cover closely to see where the leak might be coming from. As it happens, when I replaced the input shaft bearing the new bearing sits a little too proud of the gearbox face and seating the shaft cover on it leaves about a half a mil of clearance which the gasket cannot seal off. The proper engineering solution is to mill the cover recess deeper to accept the larger bearing and its thicker retaining ring. In the end I adopted an easier solution and installed a thicker gasket, supplemented by copious amounts of silicon sealer.
I then filled the gearbox with the correct gear oil and let it sit while I went to the shops to search for the correct bolts for the gearbox/bellhousing joint. My reasoning was as follows that the car was built in metric with metric threads. Any "fine" thread should therefore be a metric fine. Right? (well I hoped so)
I arrived at Struck and Schulz with the offending capscrew and asked for a similar capscrew in metric fine. OK they sez we don't have it in a capscrew we have it in a bolt and not that length either. OK sez I the bolt can be about 10mm shorter and it doesn't HAVE to be a capscrew, a bolt is fine. We eventually settle on something that looks workable and off I go and try it out. The bolt glides into its thread in the box with no problems at all, so I am thinking Birkin supplied a UNF or some other funny thread, that was nearly metric fine but just not quite. Problem solved!
Actually after checking out the spec sheets there are TWO metric fine specs M12x1.25 and a M12x1.50. So Birkin must have supplied the wrong one.
As a bonus while I have been away at the shops the gearbox has decided to play ball and not leak. Yippee!
While the box is on the workbench I remove the selector fork and install the little brass saddle on the fork. I have to bend the tabs a bit to get it to stay on the fork. Install the quick shift Quaife gear lever, test the gears 1-5 and reverse, everything is looking good.
So the box goes back on the engine, on goes the starter and everything is back to where it was. 3 hours spent sorting out that little lot.
The family come back from Polokwane and with Alastair available to help we remove the radiator and start fastening up the front suspension dampers, and installing the brake hoses, remembering to install the mounting brackets at the hard line/hose connections. Incidentally we could not get braided hoses as was mentioned before. Too expensive!!!


We move to the rear and first thing I want to do is connect the brake hoses to the hard lines below the diff. The right hand side was pretty difficult but it was impossible to do the left hand side - we just could not get our fingers in, never mind the spanners.
In the end we undo 4 of the 6 diff bolts and lift her up (pivoting on the diff front mounting) and hold it in the elevated position with some rope and a steel bar. This gave us the necessary space to get in and attach the hard lines to the snouts of the brake hoses.
After we drop the diff and insert the bolts we move on to attaching the rear hubs and brake calipers to the suspension. The only missing element is the shocks as the bottom of the shock fouls the wishbone. The shocks will be off to the engineering works to get ground down.
I grease up the ball joints, splines and threads and with no problem the hubs are installed, the nuts torqued up and the R clips installed. Fitting the rear brake calipers presented no problem either. As a final touch the handbrake cables were also hooked up although they cannot be adjusted at this point.
The rear brake discs are still not available so the brake calipers will need to come off again. The reason I attached everything up is to seal off the hydraulic system from dust. The bleed nipple setup on the rear brake calipers looks a bit dodgy.

In short we accomplished:
Front suspension and brakes completed.
Gearbox leak, and the nagging bolt thread problem sorted
Rear suspension and brakes completed, apart from the shocks
Tyres mounted on rims and balanced.
We are getting closer and closer to dropping the chassis onto its wheels, the only holdback is the rear shocks.
Thursday 23 August 2012
And now a big one...
Last night was a major leap forward - myself, Alastair and Simon Buyers (a workmate) lifted the engine of the stand and set it down on the trolley. Using a cable sling and some pipe Simon and I took up the weight while Alastair undid the securing bolts with an impact wrench. Very quickly the engine was free and we lowered it on to the trolley.
Nothing daunted we immediately bolted the gearbox to the engine and slapped on the starter. However, all this must be undone because this morning I discovered a minor leak from the gearbox coming from the bellhousing/gearbox joint.


I also fitted the exhaust headers (loosely) as I wanted to check the extent of the interference between the water rail and the headers.

This afternoon we tackled the front shocks and uprights, those went on with no problems. Encouraged, we tried the rear shocks but it seems there is an issue with the Avon shocks - no clearance between the shock lower knuckle and the lower wishbone. Out with the die grinder this weekend.....
Nothing daunted we immediately bolted the gearbox to the engine and slapped on the starter. However, all this must be undone because this morning I discovered a minor leak from the gearbox coming from the bellhousing/gearbox joint.


I also fitted the exhaust headers (loosely) as I wanted to check the extent of the interference between the water rail and the headers.

Tuesday 21 August 2012
Tiny Steps....
I've been offline the past while for various reasons, not the least of which I have just about run out of things I can do on the car without having to take stuff off again.
This is all about to change.
Yesterday Alastair collected my shocks and rear uprights from Birkin, and he is bringing them up with him. Unfortunately Dhersan has not been able to source the rear discs - those will have to be fitted later. Alastair will be here on leave for two weeks, and in that time we have the following tasks to complete:
Fit the shocks and uprights.
Fit tyres to wheels, and get some wheel studs and nuts.
Put engine and gearbox together
Install in the chassis.
Do a (very) rough wheel alignment
Plumb the cooling system.
Fit the exhaust headers and sort out any problems of interference with the water rail.
Fit the ECU, or at least plan the cable runs.
Tyre choices - I have 15" Tiger Wheel rims (Drifters) and it seems the popular choice is a 190/55/R15. Bridgestones and Pirellis are available at R690/tyre. I think I am going with the Bridgestones, they definitely looks more "grippy".
Upgrading the brake hoses - I have a pal here in town who runs a hydraulic hose business, he has offered to replace all my rubber brake and clutch hoses with teflon lined stainless steel braided hoses with stainless steel fittings for a good price. I think they will look very cool.
The small jobs I have been doing in the meantime are the pedal box cover and installing the engine mounts. Unfortunately the layout of the mounts means they have to be installed on the chassis first and the engine lifted into position and fastened to those (6 M10 cap screws - 3 a side), instead of mounting them on the engine first, and then lining them up on the chassis (2 bolts). The battery tray is also installed.
I am not going to install a heater at this time - I don't think it is necessary.
I have a Quaife quick shift gear lever on order as well as a brass shift selector knuckle.
I fitted the radiator temporarily to check for hose runs and interference - thankfully none - and that will have to come off again when we drop the chassis onto the engine - it is way too fragile for that operation. The cooler fan is attached to that but I don't seem to have a fan switch in my "Stuff-That-I-Know-I-Have-To-Use-But-I-Am-Buggered-If-I-Know-Where-It-Fits" box.
Wednesday 1 August 2012
Torquing sense....
I spoke previously of borrowing or making a tool to hold the crank pulley while I torqued down the crankshaft bolt. So I visited my friendly Ford workshop and spoke to Reg McCarthy the head mechanic.

I have noticed that the mount at the rear of the starter motor, and the engine mount share a bolt hole in the block. This means a bit of misalignment for the engine mount so I have to shave a millimeter off the engine mount so it can accommodate the starter mount. Also the Birkin supplied cap screws for the engine mount are a tad short. They will do the job but only a 10mm bite into the block? The bolts can be at least another 5mm longer.
Another little task looming is modifying the water rail to accommodate the Birkin exhaust headers. From what I can see the #1 exhaust fouls the bottom of the water rail right underneath the water outlet, and I have to machine off a chunk of the casting and re-weld a plate so that it clears. I cannot do that right now as I cannot fit the headers to the engine even for a trial fit as the engine stand is in the way of fitting the 4-1 header set in place.......Good motivation to get that engine off its stand ASAP.

He explained they don't use that tool, what they do is screw a 10mm bolt into the engine block where one of the bellhousing bolts would go, then prop an Allen key between it and the flywheel starter gear so that when you torque the crank, the allen key jams between the bolt and flywheel teeth.
I had my doubts but I tried it out - that flywheel gear looks awfully fragile...
But.....
I had my doubts but I tried it out - that flywheel gear looks awfully fragile...
But.....
Strewth, it works!!!! I gave the bolt plenty of torque (100Nm) and then a quarter turn on a reinforced breaker bar. Problem solved and it did not cost me a cent!
Another little task looming is modifying the water rail to accommodate the Birkin exhaust headers. From what I can see the #1 exhaust fouls the bottom of the water rail right underneath the water outlet, and I have to machine off a chunk of the casting and re-weld a plate so that it clears. I cannot do that right now as I cannot fit the headers to the engine even for a trial fit as the engine stand is in the way of fitting the 4-1 header set in place.......Good motivation to get that engine off its stand ASAP.
Monday 30 July 2012
Off My Trolley
This weekend was spent making my giant skateboard. Saturday I was off to EH Hassims to get some lumber and some bolts. The dudes kindly shaved the lumber to size.
Tah Daaaah!!!

I badly needed a spot to put the gearbox and bellhousing unit so that was the first thing to go on even before I took a picture.

Just to make sure of the timing I undid the bolt and removed the cam cover. I wasn't too keen on using the peg so I made a TDC indicator with a dial gauge. I bolted it to the camshaft caps and used a rod that was a perfect fit down the spark plug hole. The cams lined up - you can just see the 5mm allen keys at the back on the left and right. With the locating pin screwed into the pulley I cinched down the bolt and everything was tickety-boo.
Now the engine is properly timed and all that remains is the torquing of the crankshaft bolt. I don't have the special tool from Ford so I must borrow one or make one up.
I am thinking to make one out of tube with castellations milled out, then welded to a long pipe. This will mate to the Crankshaft pulley slots. Might work.....
Today I fitted the one thing that has puzzled me - the alternator. I couldn't figure what the spacers were used for and it turns out they are not needed. I just winged it. I couldn't get the right tension on the belt and after some searching found that the alternator body was binding on the adjustable tension bar. So that came off and ten minutes with a die grinder on the bar and I had the necessary clearance.

Thursday 26 July 2012
The week so far....
After finishing the engine and gearbox I am now faced with the prospect of installing them into the chassis.
First they have to be joined - this should not be a hassle as I have lined up the gearbox spline with the clutch and pressure plate. To that end I have fitted the bellhousing and the annular clutch slave cylinder to the gearbox. A quick dimensional check of the input shaft/slave cylinder/clutch pressure plate relationship shows everything should fit together as it is supposed to.


To join the two both have to be laid on the ground or some other surface, there is no way it can be done on the engine stand, and then taken off - it is way too heavy.
My cunning plan comprises a castor wheeled low trolley on which I can lay the engine and the gearbox, and join them up. Then roll the trolley to the waiting chassis.
I already have a heavy plank, and yesterday I got some heavy duty castor wheels - some nuts, bolts and washers and I will have a giant skateboard!
Speaking of the chassis, I have not got either my shocks or rear uprights from the factory yet. I can do nothing without the uprights, shocks and wheels in place.
I have since cancelled using the heavy plank, instead I will buy some new timber....
Wednesday 18 July 2012
Installing and timing the Camshafts
I picked up my shiny new cam buckets from the Ford dealer yesterday afternoon and installed those last night. These are just a drop-in fit so no sweat there.
Then I fitted the exhaust camshaft and checked the clearances - they are all 10 - 12 thou which is well within specification.
Up to this point the cam sprockets have been loose on the cams it was now time to install the timing chain. The workshop manual speaks of a bar that fits across the slots at the back of the two cams, but this is not usually available to the home engineer. I can however tell you that a pair of 5mm allen keys works extremely well in this situation. I had a pair of EVO 1 cam friction washers which ensures there is no "cam slip". This is very similar to the friction washer you get on the crankshaft damper - a little diamond encrusted steel washer.
With the keys in place I torqued up the camshaft bolts and draped the chain over the sprockets, installed the tensioner guides and arms, finally the tensioner itself and then pulled the pin. The tensioner instantly released and took up the slack and the whole camshaft, crankshaft, timing chain train is now completely assembled and ready for the front cover. Of course the crankshaft sprocket is loose on the crankshaft, as we still have to align the crank TDC with the cams.
I still have to get a Cam Position Sensor blanking plug, and a Cam Cover Breather banjo bolt. And a dipstick.....
Satisfied with my evening's work I covered the engine up (it's no longer just a block) and called it a night.
Monday 16 July 2012
Progress from the Weekend Part 2
I got up on Sunday morning with the full intention of assembling the gearbox. I was actually looking forward to this because it represents a real step forward in completing the car.
Previously I reported that I had assembled the mainshaft and fitted it to the intermediate housing or sandwich plate.
Here's how it went:
I take the tail housing, and install the little selector shaft oil seal and its bigger brother the output shaft oil seal.
I take the casing (heavy bugger), clean it out and fit the magnet in the bottom.
I fit the needle bearings and spacers to the countershaft gear cluster, secure them with grease and insert the countershaft. I lay this in the casing.
I insert the mainshaft and sandwich plate from the one side, the input shaft from the other, complete with the caged bearing and join them up.
I invert the case, just like the manual says. I hear a "thunk" meaning the gears have meshed and then I make sure the countershaft lines up with its hole in the casing and I tap the countershaft home.
On goes the 5th driving gear with associated spacers and washers and nut, drive it home and tighten it up. I fix the 5th driven gear in place with its associated synchromesh and circlip, then fit the selector shaft, forks and assorted goody-ma-gafters, on goes the tail housing and I am nearly finished....
BUT, in all the tapping and fitting, I have failed to notice that the 3rd/4th gear synchromesh has disassembled itself, and the spring and blocker bars have fallen to the bottom and stuck to the magnet. The reason is simple, the input shaft has moved forward in its housing, allowing the synchromesh, which sits between the input and mainshaft to come apart. Sheesh!!
I think they heard my scream in the next town......! Rita is still traumatised!!
Quickly I disassemble everything, retrieve the offending parts and go about reassembling the box. This time I make sure the input shaft cannot move forward by bolting the front retainer cover on.
Same process again but this time it seems to go a lot quicker. My only delay was cutting a new gasket. I did not want to disassemble the mainshaft to trace the sandwich plate so I resorted to the old standby of placing the gasket paper on the casing and bashing one out with a soft mallet. Works!

Assembly goes quickly and by dusk I have completed the gearbox. Quick check she goes through all the gears - SHE WORKS!!!!!! What a mission!!! Now all I need is a brass gear selector saddle, because a plastic one will not hold up. Burton's has them. I also need to make a tailhousing rear cover plate.
A whole day used up on this. But I am very chugged with myself. So is Rita, as it means a huge chunk of toe stubbing metal has disappeared from the store room to the garage
Sunday 15 July 2012
Progress from the Weekend Part 1
This last weekend was spent working on the Engine and the Gearbox.
Friday I collected the cylinder head, on which some of the bosses had been milled off to accommodate the Raceline water rail. I also collected some clutch cover bolts and a couple of the little valve retainer thing-a-me-bobs.
Friday evening I align the clutch cover with the input shaft and tighten up the clutch evenly with the bolts. Job done!
I fit the last valve, spring, spring retainer and two of the thing-a-me-bobs. Job done!
I clean the top of the block, clean the mating face of the cylinder head, fit the dowels, spray the gasket with Spanjaard copper sealer and fit that and put on the cylinder head. In go the bolts, tighten down to 45Nm in the proper order and take out the breaker bar. 90 degrees clockwise, then 90 degrees again. I am waiting for something to break or strip but thankfully nothing does. Job done!
Saturday morning I visit my oil seal shop and they have received my selector shaft oil seal which was on special order - it's an odd size. Then I go find myself an imperial feeler gauge at Autozone.
Now I am ready to dig in to the second most difficult job of the re-build, fitting the cam buckets, and the cams. To get this right you need:
Two Prozac, washed down with a stiff brandy
An Imperial feeler gauge - I can't work in mm
10mm spanner, and a 13mm spanner for turning the cam gear bolt
Your wits about you (difficult if you chew the Prozac instead of swallowing it)
Note pad and pencil
Laptop, loaded with the ACQ spreadsheet available from
www.biggles.net/download/ACQBucketSizerV20.xls
I had wisely kept a little sheet of the original cam bucket set-up when I stripped the engine so I re-assembled the cam buckets in their original slots and tightened my new Kent 210HP racing cams in their place - Green for Inlet, Yellow for exhaust. Liberal amounts of oil as well. I start measuring the clearances, I am looking for 8-11 thou clearance on the inlet, 10-13 thou on the exhaust.
The clearances on the intake side are OK, there are some anomalies, no doubt due to the new cam.
I find that on the exhaust side the clearances are very low - 8 to 9 thou, no doubt due to my aggressive valve lapping, or the new cam. This is no good because you can burn valves - 12 thou is better.
I write down the clearances I get, enter them in the little spreadsheet along with the bucket layout and HEY PRESTO! it tells me what to swop out, what to order yada yada yada.
Ford cam buckets come in a 3 number designation for example a 3.182mm bucket is just called a "182" and they go up in 0.02mm increments, which is 0.0008 thou. You find the number printed inside the cam bucket.
Of the cam buckets required on the inlet side luckily enough 4 of them sit on the exhaust side, so I can make up a full set on the inlet side.
I swop out the buckets to their advised postions, tighten down the cam and re-measure. I am pleased when I find the clearance for the whole inlet side is 9 or 10 thou, so I do not need any further messing about on that cam. I tighten the inlet cam down and make sure the cam bolts are threadlocked. Nasty moment when I get the one bolt crossed up and bugger the thread a bit but I catch it in time.
On the exhaust side I find I need 4 new buckets - 2 off 142's, a 162, and a 182. I phone Zerilda at EL Auto and give her the specs of the cam buckets I need - unfortunately the 142's and 182's don't exist in the spares directory, but the 162's do - huh? So I figger Ford must be getting a little looser on the specs so I redo my numbers and it turns out that going from a 142 to a 162 is going to give me 11 thou instead of 12 thou clearance and replacing the 182 with a 162 means 13 thou instead of 12. So I order 4 off 162's. Close enough, but watch this space.
The buckets will arrive on Tuesday. I finish off by temporarily fitting my zooty cam cover and water rail, just to see what it looks like.
I can't go any further here so that's it for the day. Tomorrow it is gearbox time. Sit back and watch the Bulls thump the Lions.
Thursday 12 July 2012
Work on the Engine
On Tuesday 10th my long awaited package arrived from Raceline! Inside: Lightweight flywheel, ARP bolts, Kent 210hp cams, valve springs, valve spring retainers, water rail, a cam cover and a host of other bits and pieces I needed, including a new clutch and a starter.
That evening is spent fitting the valves to the head. In a stroke of bad luck one of the little conical valve retainers goes PING! and is instantly teleported to the universe where these small parts go, never to be seen again. So I am one valve short of a full head. No matter I ordered another one (You can buy them singly!). On fitting valves, you can NOT pay me enough to do it again - it has to be one of the worst tasks you can do on an engine. I merrily assembled the inlet side, and then realised I had put the valves in, in the wrong order, I had not checked end which was the front of the head. Doh! Undo it all and do it again.
Advice to all: BUY A DECENT VALVE SPRING COMPRESSOR!!!!
My next move was to check the fit of the water rail to the head - something I should have done first. As luck has it the head I have is an old one and the water rail is meant for newer engines so my head has a couple of threaded bosses where the new heads don't have any, so it is off the the local engineering works to machine off the offending bits, so it can fit.
I move to the flywheel and thankfully that goes on to the correct torque - 95 ft lb!! =8O
Then I discover I have no clutch cover bolts. Grrr!!! So I can't fit the clutch and line it up using the input shaft.
I now have run out of things to do on the engine so last night I move to the gearbox with the intention of assembling the mainshaft. I assemble the shaft as per the instructions but to my chagrin I have a thin washer left over, which clearly has the staining of a splines on it so it fits SOMEWHERE but the exploded diagram does not show it. I dissassemble, check and reassemble - everything fits where it should. Then I see it is the same internal diameter as the 5th driving gear securing nut on the layshaft so it fits below the 12 sided nut, but is not shown on the diagram. Phew!!!!
So the mainshaft is assembled, I can only assemble the gearbox once I have got the selector shaft seal, and used the input shaft to line up the clutch once I have the clutch cover bolts.
The gaskets for the gearbox were toast so with the aid of some lipstick, gasket paper, a craft knife and a 11mm punch, I have created some new ones. It is quite simple, coat the surface with lipstick, press on the paper, you now have a pink outline on the paper, cut out with a craft knife and punch the holes. Piece of old takkie - very professional looking in a garish Revlon pink.
So to date I have a half finished engine, and a half finished gearbox.
We are getting awfully close to being able to fit the engine to the chassis and if I don't get the uprights and shocks soon I am going to be held up.
Saturday 7 July 2012
Progress on the Diff
This weekend was a pretty lax one.
First order of business was to collect the bearings from the local BMG agent on Friday. R800 later I had a front input shaft bearing 566096, rear mainshaft bearing 362021, Tail seal CR13527 (14.3 X 25.37 X 6.35), but no selector shaft oil seal. OK, so I stuck those away and on this morning I had a fresh look at the diff.
I have made mention of the oil seep from the front pinion and how I would have to replace the seal that sits behind the flange.
Now I really did not want to take the diff all the way out and I didn't want Hypoid oil all over the floor so I undid the front and rear mounts (the central mounts were not in yet) and removed the drive shafts. I hoisted up the diff with the flange up so the oil would stay in the box and I pulled the flange with a puller. This was the easy part. Behind it lay the seal which was dug in tighter than a tick, and nothing less than total destruction of the seal was going to get it out. Having done so I replaced the seal. I noted a worn groove on the flange so I seated the seal just a little deeper in its recess so it would have a fresh surface to seal on.
So I tighten that lot up and set to putting the diff back in its proper place. What a horror story this was, the damn thing is so clumsy you do need 3 hands - 2 to lift and hold in position, and one to slide in the bolts.
As it turned out, I was able to get in the 2 front mounts, but the bolt for the left centre mount refused to catch the thread. A mirror and strong light revealed the thread was damaged. Off to the hardware store to buy an M12 tap.
I cleaned up the offending thread and hey presto the two centre mounts were in but now the rear mount would not line up with the matching holes in the rear aluminium mounting plate. The mount wanted to be 3mm low and 5mm to the right of the holes. I could live with the low part, but the off-centre part I was not so sure.
OK, I was at a bit of a crossroads here, obviously the bobbin brackets welded to the frame were off so the left hand spacer was too "fat" forcing the diff over to the right. What I did was to drill new holes to accommodate the diff as she lay but I am going to have to relook at this because you can pick up that the diff is not exactly perpendicular to the mounting plate, but only if you knew and only if you look very, very closely. What this would do in operation I do not know but I am fairly sure that some sort of vibration would result as the main propshaft would not be inline with the diff, and the road wheels would not be perpendicular to the drive shafts.
So next weekend I am going to do this all over again.
I have just received notification my box of bits from Raceline has arrived so I will see those on Monday.
Monday 2 July 2012
Slight setbacks
Ok, y'all read how we suffered to put the diff into its spot - well I discovered yesterday that the diff has a slight leak from the input pinion oil seal. I addition to that, I got the 12mm bobbins from the factory. After installing them, I found that there is no way in this world or the next that THAT particular diff is going to fit at the front, rear and centre mounting points. I am guessing that the rear mounts are going to have to be modified to suit the set-up. So out she comes.
This means that all my hard work installing the fuel tank will have to be undone. Curses. Alastair is going to blow a fuse.
The pistons that I sent to have fitted to the rods? Well the guy doing the fitting let one of the gudgeon pin retaining circlips "get away" in that it went "PING" never to be seen again. Well, you can't have 3 pistons fully clipped and one with only one circlip (spoils the balance you see...) so I told 'em to remove all the circlips and replace them with all new circlips of a different type. Not too sure they are actually needed as the stock set-up does not have circlips but Cosworth must have supplied them for a reason....
More positive aspects of the weekend....
I cadged one of my old pistons and set about fitting the Cosworth rings to the bores. Very much to my surprise the rings fit with no modification, the gaps are all within spec.
After I was unsuccessful with getting the pistons I also started with fitting the bearings, crankshaft and cradle to the block. Torqued it all up as per the book. It rotates smoothly and no trace of play. Installed the new rear crank seal and oil pump too.
Then I got carried away and started to fit my fancy low-profile sump but stopped in time because the pistons were not in yet! Stopped for the day and shrouded the block with a new black garbage bag.
I also finally made sense of the gearbox diagram and put all the gears loose where I could on the main shaft, now I am just awaiting the bearings and seals and I can put it together. But NOT before I get the spigot bearing, flywheel and clutch from Raceline because I need the input shaft to line up the clutch disc and flywheel before I bolt the cover to the flywheel. I also memorised the re-assembly procedure in my head. Fortunately I will be reassembling with the parts clean and lightly oiled, which is always so much more pleasant.
I used my Dremel to polish up the face(s) of the sandwich plate on the gearbox because whoever last stuck the gasket on must have used self-petrifying gorilla snot. No amount of scraping could remove it, so I reverted to the polishing wheel. Worked like a charm.
Subscribe to:
Posts (Atom)